Veganbaking.net
Vegan Baking Recipes
Vegan Bread Recipes
Vegan Enriched Bread Recipes
Vegan Yeasted Enriched Bread Recipes
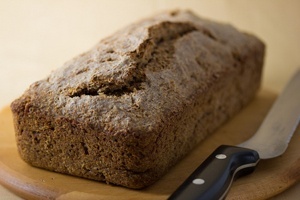
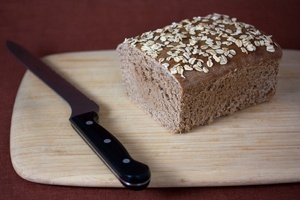
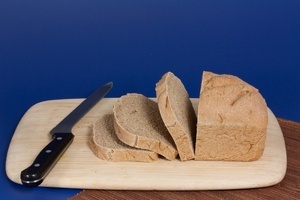
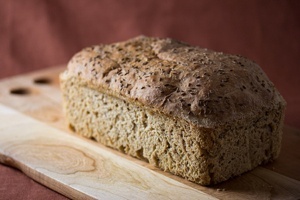
Flourless Sprouted Whole Wheat Bread
Flourless Sprouted Whole Wheat Bread

4

Traditional flour is ground endosperm powder which is the result of the flour mill removing most of the hard pieces and hence, nutrition from the wheat berry. I'm a huge fan of whole sprouted grains because they're more flavorful and contain significantly more nutrients than bread made with traditional flour. This Flourless Sprouted Whole Wheat Bread recipe utilizes sprouted wheat berries that are then ground into a purée. This requires a substantially hardy food processor. If you're not sure if your food processor is powerful enough, look on the bottom. It should say at least 6.5 Amps or "6.5 A".
This bread was difficult to design due to the nature of the wheat berry. This hardy seed contains the germ which is the heart and soul of the seed. The germ is the embryo of the plant in its dormant state. It's is accompanied by the starchy endosperm which acts as fuel for the germ when it sprouts or germinates. This package is encased in a firm fibrous shell called the bran. This protects the seed kind of like an egg shell protects an egg.
The science of sprouting wheat berries and making them into bread
In order to make bread from wheat berries, the wheat berries need to be softened so they can later be ground into a powder. Soaking the berries then allowing them to germinate for a couple days softens the berries. The germination step also has the advantage of releasing more nutrients as the seed prepares to become a plant. But what causes the germ to turn into a sprout and grow? During the soaking of the berries, enzymes called amylases in the bran layer become active and start to infiltrate the starch granules in the endosperm. Starches are made up of complex sugars which are made up of strings of glucose molecules. The amylases break the glucose molecules off of the starches into smaller groups of sugars consisting of one, two and three glucose molecules. Think of the amylase molecules cutting Fruit Loops off of a Fruit Loops necklace so they're smaller and easier for you to eat. Like us eating Fruit Loops, the germ happens to love these small sugars so it begins to grow and the seed continues to soften. This germination step assists leavening in breads because yeast also prefers glucose for it to function optimally.Note: This is why some bakers, including yours truly, love storing bread doughs in the refrigerator overnight. It gives the amylases time to do their work while the cold temperatures keep the yeast dormant. The excess sugars in the dough and the increased amylase activity generates a more flavorful loaf with more yeast activity.
Once the seeds have sprouted to no more than ¾ the length of the grain, they're ground. The best way to do this is with a flour mill. I didn't want to disservice vegan bakers by instructing them to buy home flour mills that cost up to hundreds of dollars just to make flourless sprouted breads. There must be a better way to easily enjoy this uinique style of bread. If you do splurge on a home flour mill, you'll be rewarded with considerably fluffier and lighter bread. I settled on using a food processor to grind the wheat berries into a purée which results in an extremely dense, hearty loaf with chunks of wheat berries. I only recommend making this bread if you adore whole wheat breads. If you have a plush, soft spot for fluffy white breads I advise you to avoid this recipe.
As the endosperm hydrates, proteins contained within it called glutenin and gliadin unravel. Kneading, rest time or both contribute to the binding of these proteins into gluten. Gluten is a high protein, pliable rubbery mass that holds the bread together and acts like a net to trap rising C02 bubbles given off by the yeast.
Once the berries have been puréed, salt is kneaded in. This salt has a slight protective effect which lessens the chances that pathogenic microbes growing in the dough before the amylases can get their start. The dough is then left to rise and proof in a bread pan just as with normal flour-based bread.
The problem with bran husks
There is a reason there is a flour milling industry that's been considerably successful during the last several hundred years. The wheat berry doesn't lend itself well to the breads we know and love. The bran layer is the main culprit here due to how it cuts through the dough, severing critical gluten bonds as it's kneaded. The bran also acts as a barrier which blocks glutenin and gliadin from even getting the chance to join in the first place. Talk about a missed opportunity. Since these gluten bonds aren't able to be fully developed the bread is unable to hold the rising C02 coming off the yeast and the loaf results in a powdery brick.In the course of developing this recipe I actually gave up at one point due to the amount of loaves I was producing that resembled fireplace sawdust wax logs. Maybe I could market these in cold climates and start a whole new industry? The flavor also wasn't interesting enough to justify the several days of preparation time. Finally, the bread crumbled while being sliced. The gluten just wasn't able to make strong enough bonds to hold the loaf together.
Still having some wheat berries in my pantry, I decided to give it another go. After I ground the soaked and sprouted wheat berries I had to step out before kneading in the yeast and other ingredients so I gathered the wheat berry purée into a ball and placed it in an air-tight container in the refrigerator for a few days. When I finally got around to making the bread I noticed it was rising while being baked! And the taste. The taste! The bread was like sourdough bread but didn't involve using a the traditional sourdough starter. Why was this happening?
My Eureka! bread moment
It turns out that leaving the wheat berry purée to sit and rest or ripen was the missing link for this bread. During ripening a couple things happen. The stiff bran husk gets a chance to hydrate and soften considerably. This softening allows them to become flexible to the point of where they don't inhibit gluten development like they used to. The other miracle that happens during ripening is flavor development. As the wheat berries are sprouting out in the open, as the amylases are converting much of the starches in the germ to sugars, the wheat berries are also getting inoculated by natural airborne yeasts and bacterias such as Lactobacillus. When the wheat berry purée is allowed to rest, these bacterias and yeasts consume the sugars and impart flavors such as lactic acid as byproducts. This flavor development is exactly what happens in wild yeast starters involved in sourdough bread baking.This bread is unique in that it rises extremely slowly. This is due to the bran husks creating tiny channels that allow the yeast's C02 to escape. Once I discovered the results after the ripening of the wheat berry purée I was able to refine my methods and develop the recipe below.
Find more Flourless recipes on Veganbaking.net
Flourless Sprouted Whole Wheat Bread Recipe
3 ¼ cups (620 grams) wheat berries (hard red winter wheat preferred)
1 ½ teaspoons salt
2 ¼ teaspoons, or one ¼ ounce package active dry yeast
1) Soak the wheat berries
Soak the wheat berries for 18 to 24 hours. Drain then sprout the wheat berries, rinsing 2 to 3 times per day until the sprout is no more than ¾ the length of the grain. This should take about 24 to 36 hours and will vary depending on the temperature and humidity of your kitchen. If the berries sprout and you don't have time to proceed to Step 2, place them in the refrigerator to slow their sprouting rate down. Here's more information on sprouting grains.2) Process the wheat berries and allow them to ripen
Add about half of the wheat berries to a food processor and sprinkle half the salt over them. Process until the mixture comes together into a ball which should take a minute or so. Stop the food processor and use a spatula to work around the perimeter of the food processor and push the mixture back down to the blades. Process again until the mixture gets too thick to mix any further and the blades just spin underneath, or about 1 minute. Transfer the wheat berry purée to a clean counter.
Process the other half of the wheat berries just as you did the first, taking care to add the other half of the salt. Add this wheat berry purée to the first batch on the counter and knead for about a minute to ensure the salt is evenly distributed throughout the whole mixture.
Form all of the wheat berry purée into a tight ball and place it in an airtight covered container. Leave the container at room temperature for 1 to 2 days. This step is crucial because it allows the bran layer to soften and the amylase enzymes to break out sugar for the yeast to eat. Leaving the purée out also allows the bread to develop a complex sourdough flavor. If you don't prefer sourdough flavors, leave your purée out for no more than about 12 hours.
Feel free to taste the wheat berry purée and allow it to sour to your liking. Once its ripened to your preferred sourness either move to Step 3 immediately or freeze it for later use. If you place it in the refrigerator it will keep ripening. It's also important to not ripen the purée for more than 2 days because it can start to go rancid and become unsafe to eat. This can happen when the current residential yeasts and bacteria eat all the available sugars they can and die off, leaving the environment open to different types of harmful microbes. If your dough becomes rancid or you’re not sure if it’s safe to eat, discard it.
3) Add the yeast and knead the dough
Transfer the wheat berry purée to a clean counter, sprinkle the dry yeast over it and knead for no less than 20 minutes. The knead is lengthy to ensure as much glutenin and gliadin, as possible is drawn out of the wheat kernels and activated into gluten. It also allows the yeast to hydrate, become active and disperse into the dough. It’s fascinating to see how the gluten develops throughout the kneading process here! Towards the end of the knead you’ll start seeing extremely long strands of gluten develop.4) Allow the yeast to get active
Transfer the dough to a medium mixing bowl and form it into a ball. Cover the bowl with a plastic bag and let it sit for about 1 ½ hours. This dough will not rise considerably because the bran husks create tiny channels that allow the yeast's C02 gas to escape instead of contribute to leavening. Most of the leavening in this bread is done during the proofing stage which is the second rise after it has been placed in a loaf pan.5) Allow the bread to rise
Form the dough into a lightly oiled loaf pan, cover it with a plastic bag and and let it sit for about another 1 ½ to 3 hours. A loaf pan is essential here. This dough is too moist to bake in a freeform hearth style and will flatten considerably if baked in this manner. This is the part where your bread will do most of its leavening. This process will take longer due to the weight of the dough and the dough not being completely airtight due to the wheat berry and bran particles.6) Bake to perfection
About 45 minutes before you’re going to bake the bread, Preheat your oven to 350F (177C). Bake until the internal temperature of the bread measured with an instant-read thermometer registers 180 to 190F (77 to 82C). If you don't have a thermometer, this is about 60 to 65 minutes. Remove from the pan when cooled completely. I recommend slicing this bread and storing it in a plastic freezer bag in the freezer. Stored this way it will keep for several months. This recipe makes one loaf of Flourless Sprouted Whole Wheat Bread.