Veganbaking.net
Vegan Baking Recipes
Vegan Bread Recipes
Vegan Enriched Bread Recipes
Vegan Yeasted Enriched Bread Recipes
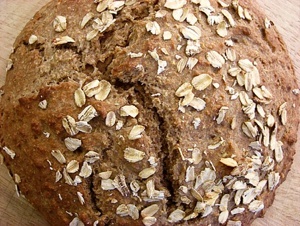
Easy Vegan Wheat Bread
Easy Vegan Wheat Bread

5

There's nothing quite like home made bread. This hearty Easy Vegan Wheat Bread recipe is easy to whip up if you have a few hours and it's really simple. In bread baking, longer rise cycles at lower temperatures usually result in more flavor compounds that are generated due to the yeast extracting and break down more starches in the flour and converting them into sugars which will then get caramelized during baking. Some doughs call for an overnight rise in the refrigerator so optimum flavor can be developed. In this vegan loaf you have the option of doing an overnight slow rise in the refrigerator or a regular rise. The two first rise cycle is for the main fermentation of the dough where the yeast eats the most sugars and rises the bread with CO2. The last rise is called proofing in where the dough rises after it's been molded into it's desired shape or placed in it's specific mold.
In bread baking it's absolutely essential that no shortcuts are taken when following a recipe because you're manipulating a fermentation with very exacting tolerances; just like when brewing beer. Any deviation can result in a botched experiment, aka a brick.
Find more Whole Wheat recipes on Veganbaking.net
Easy Vegan Wheat Bread Recipe
1 ¾ cups + 3 Tablespoons warm water2 Tablespoons maple syrup or agave syrup
2 ¼ teaspoons, or one ¼ ounce package active dry yeast
4 cups whole wheat flour
1 ¾ teaspoons salt
1) Activate the yeast
In a small mixing bowl, whisk together the warm water, maple syrup and yeast. Let the mixture sit for about 10 minutes so the yeast activates.2) Whisk together the dry ingredients
In a medium mixing bowl whisk together the whole wheat flour and salt.3) Assemble the dough
Add the water mixture to the flour mixture and stir with a wooden spoon until the dough comes together into a sticky ball.4) Knead the dough and let it rise
Transfer the dough to a clean surface. Knead for 12 to 15 minutes while adding flour only if the dough gets too sticky to work with. Form the dough into a ball and lightly coat it with oil. This will reduce the dough's tendency to dry out while it rises. Place it in a bowl, cover with a plastic bag and let it rise in a warm place until it's doubled in size, about 1 ½ hours. Alternatively, place in the refrigerator for about 12 to 24 hours. Remember that we want our dough to double in size regardless of whether it spends a full 24 hours in the refrigerator or rises at room temperature. Feel free to let it rise in the refrigerator for some of the time and outside of the refrigerator the rest of the time.

5) Let the dough rise once more
Degass the dough by pressing on it with dampened hands several times until no more gas comes out of the dough. Form the dough into a ball again and let it rise until it's doubled in size, about 1 ½ hours. If you did your last rise in the refrigerator, do this rise at room temperature and allow 4 hours of rise time.6) Proof the dough
The dough can now be proofed by gently forming it into a lightly oiled loaf pan and allowed to sit covered with a plastic bag until it reaches about 80% to 90% of it's intended size, which should be about 40 minutes. The proofing stage is where the dough takes most of it's shape. It's important to leave room under the plastic bag so the dough can rise sufficiently.7) Bake the vegan wheat bread to perfection
Preheat your oven to 375F (191C). Remove the plastic bag so the dough can rest for about 10 minutes while your oven is preheating. During the baking process, the dough will rise another 10% to 20% of it's intended size in the process known as oven spring. Bake until the internal temperature of the bread measured with an instant-read thermometer registers 180-190F (82-88C). If you don't have a thermometer, this is about 25 to 30 minutes or until the bottom of the loaf sounds hollow when the loaf pan is tapped with a blunt object like a rolling pin.8) Allow the bread to cool slightly
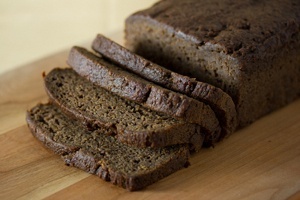
Remove the bread from the loaf pan after about 15 minutes. Allow the bread to cool on a wire rack until it's room temperature. This bread is best stored covered in a cool dark place or pre-sliced and stored in a plastic freezer bag in the freezer. This recipe makes one loaf of Easy Vegan Wheat Bread.